Have you suffered from a hamstring injury? How are you treating it? If your answer is “with rest and ice,” then you’re not alone. But this treatment plan isn’t the only way to heal yourself of a hamstring injury! In fact, there are many alternative methods that can be used in conjunction with rest and ice to help prevent future injuries.
Yoga is one of these alternatives, but it’s also excellent for healing an existing injury. With this blog post, we will discuss how yoga can help with both the prevention and recovery of hamstring injuries. We’ll talk about what yoga poses are good for preventing hamstring strains as well as some poses that are good for recovering from them!
There’s nothing like a good stretch to ease stiff, sore muscles, right? Except when it makes things worse, which can happen if that tender spot is signaling a muscle tear.
Surprisingly, hamstring tears and strains happen quite often to yoga practitioners because of repetitive overstretching, especially when combined with insufficient strength in the muscle to counterbalance flexibility. Overstretching can cause micro-trauma or small tears (versus a big trauma like a large tear from a fall) in muscle, ligament, tendon, or other soft tissue of the musculoskeletal system. And once you’re injured, ongoing stretching can prevent healing, setting the stage for chronic or recurrent inflammation and pain, and making the affected tissue vulnerable to further tearing.
If you study common practice sequences, you’ll see that it’s easy to overdo stretching. Many sequences contain a high percentage of hamstring stretches, including some standing poses, standing forward bends, seated forward bends, and other back-of-the-leg stretches.
On the other hand, hamstring-strengthening poses are typically practiced less often, so we’re missing out on their ability to build endurance in the actual muscle fibers. Working the muscle also creates strength and toughness in the tendons that attach the muscle to the bone, making them less likely to strain and tear.
What you need to know about the hamstring

Let’s take a closer look at the three hamstring muscles. Each originates (attaches) on the sitting bones of the pelvis, and runs down the back of the thigh. There are two hamstrings on the medial (inner) side of the back of the thigh, and one on the lateral (outer) side; all three attach by long tendons crossing the back of the knee to the lower leg.
Usually, a bit of mid muscle discomfort on the back of the thigh won’t cause problems. However, pay attention if you feel discomfort or pain near the sitting bones as you stretch or if you find it painful to sit for extended periods, especially on a hard surface. If this is the case, stretching the hamstrings during your practice will leave them sorer afterward, due to renewed microscopic tearing and painful inflammation.
I’m healing from a hamstring injury. Can I do yoga?

Short answer? Yes. But if you suspect you have strained or torn your hamstring through excessive stretching, it’s time to change your practice to avoid constant re-injury and to facilitate healing. Stop stretching your hamstrings—this could be for just a few weeks, or in more serious cases, a few months. Students often object, but unless you want a chronic or recurrent problem, you simply need to give the tissues time to heal.
However, you don’t have to halt yoga entirely: Practice poses for upper-body strength or quadriceps flexibility, or focus on pranayama, for example. Once the tearing has healed—that means a week or two with little or no pain—you can gradually resume stretching, but start gently, with only one pain-free stretch at a time.
Even while the hamstrings are healing, you can begin strengthening them about every other day (once a week isn’t enough to build strength). Strengthening increases blood flow, and a good blood supply promotes healing and makes for healthier, more resilient tissue. However, pain is a sign that the tissues are still too inflamed and won’t be able to bear the load without further irritation. In this case, you may need to wait a bit longer after you stop stretching to begin strengthening.
When you’re ready, you can easily start traditional resistance training at home, with a light ankle weight of 2–3 pounds. Lie on your stomach with your legs straight out behind you on the floor. Bend your knee at a 90-degree angle, with your shin perpendicular to the floor and your thigh on the floor, then lower your foot back down. Complete 10 repetitions, smoothly and slowly, and gradually build to 3 sets of 10 reps.
Yoga poses to strengthen the hamstring
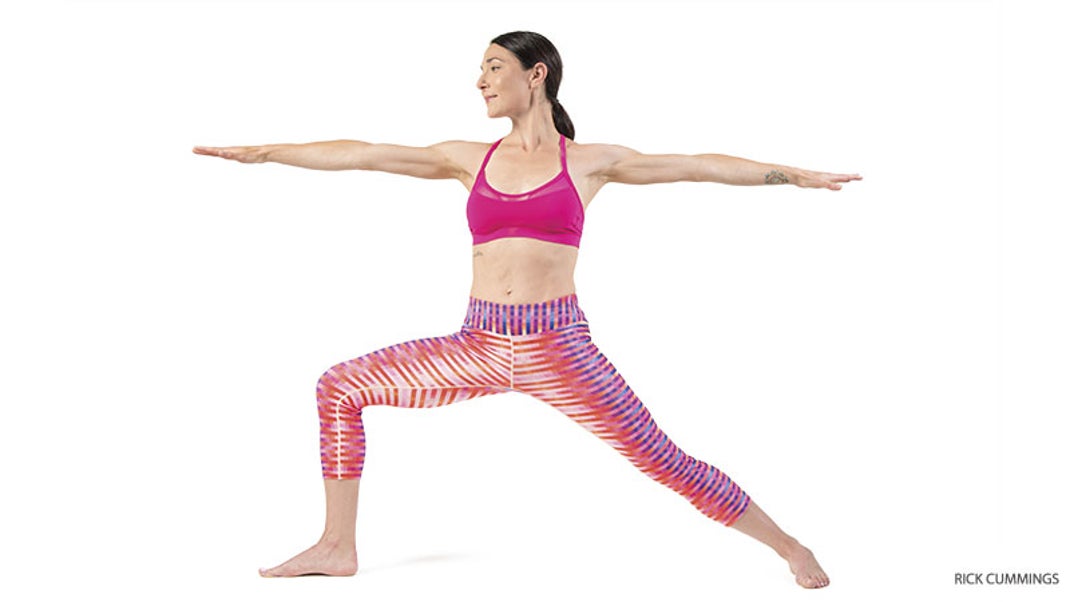
To work on hamstring-strengthening yoga poses, focus on bent-leg standing poses like Virabhadrasana I and II (Warrior Pose I and II) and Utthita Parsvakonasana (Extended Side Angle Pose). Most yoga practitioners are aware that the quadriceps on the front of the thigh are working hard in these poses, but the hamstrings are working too, co-contracting with the quads of the bent knee to stabilize that hip and knee against the pull of gravity. Be sure to use a timer to help you gradually build your hold time—you might start with 15 seconds and build to one minute—as holding these poses builds quality isometric strength.
Working a muscle isometrically, or contracting without changing the muscle’s length, trains it to “hold” and stabilize, an important function for general posture and for any poses requiring you to hold your body weight for more than a few seconds against gravity.
You can also strengthen the hamstrings during hip extensions in such poses as Salabhasana (Locust Pose) as you lift the whole leg off the floor, and Setu Bandha Sarvangasana (Bridge Pose). These hip-extending poses put more load on the upper part of the hamstring, likely helping to increase strength and bulk in the strained area at the sitting bones.
As your injured hamstring heals—and be patient, as it may take several weeks—gradually rebuild your asana practice so that you have a good balance of hamstring-strengthening and stretching poses. Try doing some of the hamstring-strengthening poses in the first part of your practice, and then stretching them afterward when the muscles are warm and tired and ready to relax. Or, you can focus on the strengthening poses one day and work on deep stretching the next. Your goal for optimal health is to cultivate muscles that are strong and flexible and able to support your joints fully, while still allowing a full range of motion in a wonderful variety of poses.
Why Bridge is best for hamstring injuries
Bridge Pose is a very effective hamstring-strengthening posture. The hamstrings work hard to lift the pelvis off the floor and help to build the arch of this beginning backbend. Practicing some bent-leg standing poses (remember those Warriors!) is a great way to warm up for Bridge. Then, lie on your back, with knees bent and feet flat and pulled in close to your hips.
Make sure your feet are parallel: Feet and knees turning out can contribute to knee and back pain. To get the best possible contraction from your hamstrings, start by lifting only your tailbone off the floor while leaving your sacrum and low back on the floor. Imagine your pelvis is being pulled up by a string attached to your pubic bones, creating posterior pelvic tilt.
(Lifting from your navel elicits almost no contraction by the hamstrings and leaves the tailbone to hang down, creating low-back discomfort and anterior pelvic tilt—the opposite of what you want.) Once you’ve started the lift from the tailbone, continue to roll up sequentially, from the sacrum to the lumbar vertebrae to the mid-back, coming into full Bridge or one of the variations that follow.
Variations
If you have arthritis, disc injuries, or other low-back problems, and want to avoid back bending, you can stop at Half Bridge Pose, forming a straight line from shoulder to hip to knee. Without putting any backbend in your spine, your hamstrings will be working hard to hold up your pelvis and press the pubic bones toward the ceiling. Or, if your back is healthy, you can continue rolling up into full Bridge, opening your chest and eventually lifting up enough to place your palms on your back ribs, fingers pointing toward the spine.
Continue using your legs to lift the pelvis, which not only strengthens the hamstrings but also helps take the weight off your wrists. For additional hamstring focus, put a belt around the front of your ankles and hold the ends with your hands near your ankles.
Once you’re up in the pose, pull on the belt as you try to draw the tops of your shins toward your hips. Roll up and down 3–4 times, gradually building your hold to a full minute or more each time. Do this sequence a few times a week and you’ll be well on your way to stronger, pain-free hamstrings.
Conclusion:
How to Use Yoga to Prevent (and Heal) a Hamstring Injury
leg off the floor, and Satu Bandha Sarvangasana (Bridge Pose). These hip-extending poses put more load on the upper part of the hamstring, likely helping to increase strength and bulk in the strained area at the sitting bones.
As your injured hamstring heals—and be patient, as it may take several weeks—gradually rebuild your asana practice so that you have a good balance of hamstring-strengthening and stretching poses. Try doing some of the hamstring-strengthening poses in the first part of your practice, and then stretching them afterward when the muscles are warm and tired and ready to relax.
Or, you can focus on hamstring poses without doing them repeatedly. A long Supta Padangusthasana (Reclining Hand-to-Big-Toe Pose) is a great way to lengthen your hamstrings when you’re finished with all the strengthening work, and it can also be helpful for any back pain that occurs during or after hamstring stretches.