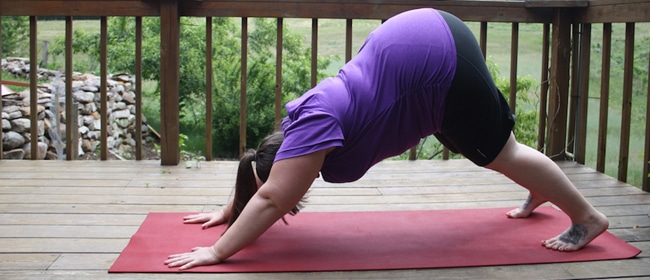
The Downward Dog Pose, or Adho Mukha Svanasana in Sanskrit, is one of the most recognizable and fundamental yoga poses.
It’s a cornerstone of many yoga practices, providing numerous benefits for the body and mind.
In this article, we will guide you through the steps to achieve a proper Downward Dog Pose, ensuring that you reap all its benefits while maintaining proper alignment and technique.
Step 1: Starting Position
Begin on your hands and knees in a tabletop position. Your wrists should be under your shoulders, and your knees under your hips.
Step 2: Hand Placement
Spread your fingers wide, creating a strong foundation with your palms firmly pressing into the mat. Your middle fingers should be pointing forward.
Step 3: Tuck Your Toes
Curl your toes under, lifting your knees off the mat. As you do this, engage your core muscles to stabilize your spine.
Step 4: Hips to the Sky
Press your hips upward and backward, creating an inverted V shape with your body. Your goal is to lengthen your spine and keep it straight.
Step 5: Straighten Your Legs
Begin to straighten your legs while keeping your heels off the ground. Don’t worry if your heels don’t touch the floor initially; flexibility will improve with practice.
Step 6: Alignment of the Feet
Ensure that your feet are hip-width apart and parallel to each other. Your toes should point forward. Press evenly through both hands and feet.
Step 7: Lengthen the Spine
Lengthen your spine by reaching your tailbone toward the ceiling and pushing your chest toward your thighs. This elongation creates space in the spine.
Step 8: Neck and Head Position
Relax your neck and let your head hang freely between your arms. Gaze toward your toes or at your navel to maintain a neutral neck position. Avoid letting your head hang heavily.
Step 9: Breathe Deeply
Take deep, even breaths in this pose. Inhale through your nose, and exhale through your mouth or nose. Focus on expanding your ribcage with each breath.
Step 10: Hold and Release
Hold the pose for 30 seconds to a minute, or longer if comfortable. To release, gently bend your knees and come back to the tabletop position.
Tips and Modifications:
- If your hamstrings are tight, it’s okay to keep a slight bend in your knees.
- Use yoga props like blocks under your hands if you have difficulty reaching the ground.
- If you have wrist issues, try gripping the mat with your fingers for stability.
- To deepen the stretch, you can lift one leg at a time, extending it straight behind you.
Conclusion
The Downward Dog Pose is a powerful yoga posture that provides benefits such as improved flexibility, strength, and stress relief. Practice regularly, and with time, you’ll refine your technique and experience the full potential of this pose.
Remember to prioritize proper alignment and listen to your body to avoid overexertion. Enjoy the journey of mastering this foundational yoga pose on your path to greater health and well-being.